Wednesday 31 May 2017

Sneak Peek: Soft Sayings Card Kit.


Don't you just love a sneak peek! Here is one of my favourite things in the new catalogue, which is only a few days away!


It's a brand new all-inclusive Card Kit called Soft Sayings. 

In the kit are 20 Cards, 2 of each design, in 3 different sizes, with matching envelopes. Everything comes in a neat presentation box so you can take it on the run and work on your cards at your own pace. Everything you need will fit inside the box. The stamps, ink spot and acrylic block are provided, all you need to supply is adhesive.

Here is a video showing you what's inside. The all-inclusive kit will be available in my online store from June 1st.

Item # 145466 $61.00


Thanks for shopping with me!
Have a wonderful day.

Vicki x 💝

Tuesday 30 May 2017

Grab a Cafe Bag To Go. Australian Stampin' Up! Demonstrator


The very practical Petite Cafe Gift Bags #135826 have been a big success in my classes, as I love to include a surprise Goody Bag for everyone who comes to my classes Sutherland Shire.

The cafe bags are retiring soon, so I thought I would show you what I gave away in my last class. One of the fun techniques we tried was embossing on vellum, then scribbling over it with a marker to reveal the greeting, in this case "You are remarkable" from the Remarkable You stamp set.

The bags are lined with food-safe paper so they are perfect for giving baked goods too!

                                                                      BUY NOW
               Have a creative day, and thank you so much for shopping with me.  Vicki x 💝

Monday 29 May 2017

Artisan Watercolour Technique

Hello, and thanks for visiting today. I promised I would show you some of the water colouring techniques I have been studying at the Regional Gallery.

This gorgeous stamp set Touches of Texture is just so easy to work with.
I used Arches Aquarelle paper for this technique, as it has a real tooth and soaks up the colours so thirstily. I generally use the Stampin' Up watercolour paper, but this technique works best with a really heavy paper.
I have a selection of different papers I use, and the results differ greatly, depending on the result you want to achieve.

To achieve this look I stamped in Memento tuxedo black ink, then took my thick brush and did a water wash over the area outside the stamped image in the places where I wanted a background effect.
I then applied the background colours by drawing a line with my Stampin' Write markers, without touching the stamped image, but staying close to the flower. 
I used a number 4 round brush for this, and came in with a number 2 round brush in the finer areas, dragging the colour out towards the edges of the background. 
When I had achieved the desired result I heat set the ink.

To colour the flowers I used the number 2 round brush dipped in water, then picked up colour from the lid of the ink pad. The stripes were made by simply leaving some areas bare. 

   I did the same technique with the centres and the leaves, and used a white Jellyroll marker to make a stippled ring around the middle of the petals, which gives a real 3D effect, as though the petals are curving outwards.


You can see in this close-up how I kept the background colours outside the stamped image.

The colours I used were Crushed Curry, Tempting Turquoise, Garden Green and Melon Mambo.
I stamped the words I Love You. You Are Fabulous, using the Thoughtful Banners Stamp Set onto Melon Mambo Cardstock.

Here you can see the stippled white ring I made with the white Jellyroll pen. 

I was absolutely thrilled with the result, and am looking forward to using this technique with all my large floral stamps.
I mounted the card onto Tempting Turquoise Cardstock, and used the same watercolour paper for the inside layer of the card.
Mission Accomplished!

I hope you enjoyed this tutorial.

Touches of Texture   Wood Mount 141934   Clear Mount 140517

 Thanks so much for shopping with me!  Vicki  x 💝


Sponging Irresistibly Floral Specialty Paper Part 2.


Hello, and thanks so much for visiting my blog today!

Sometimes a card comes together that feels just right, and when I saw how much the sponged background looked like a trellis, I knew some simple Whisper White framelits were all that was needed to bring it to life.

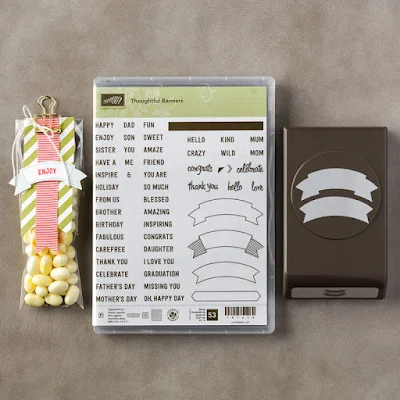
 I combined the Pretty Pines Framelits with Paisleys and Posies, and voila! ... all that I needed was a greeting, so I made a custom greeting from the Thoughtful Banners Stamp set. With a total of 54 stamps, this set has just about any greeting you can think of, and it was fun putting together a phrase that suited the card.

Thoughtful Banners Photopolymer 141614


The colours I used were Daffodil Delight, Tempting turquoise and Rich Razzleberry, and I mounted everything onto a Rich Razzleberry card base. The sentiment was heat embossed in white on Rich Razzleberry.


           Bundle and Save 10% Thoughtful Banners Stamp set plus Duet Banner Punch 142330
                                                                     BUY NOW

The stamp set comes as a bundle with a handy dandy punch (gotta love that!), which makes stamping a breeze. For my card I cut a simple banner from Rich Razzleberry and adhered it to the very edge of the card.


I enjoyed whipping up this project, and I can't get enough of this gorgeous Designer Series Paper , Irresistably Floral 141644 ,which is retiring soon.

Thanks for stopping by today, and I will have more projects tomorrow. Have a wonderful weekend.

                                       Thanks so much for shopping with me!  Vicki  x 💝

Sunday 28 May 2017

Canvas Art with Felt and Birthday Blooms. Australian Stampin' Up! Demonstrator


Hello, and thanks for stopping by my blog today.
I love working on canvases. The work we do as card makers and paper crafters is often more art than card, and in this case I wanted to try something that I could use as a home decor piece. 


The stamp set Birthday Blooms is one of my absolute favourite sets for colouring. I used Shimmery White card stock, and stamped half of the blooms in Tempting Turquoise ink, and the other half in Dapper Denim ink.

I coloured inside the petals using a number 2 round brush and used the squeezed-together ink pads as my palette, drawing some of the colour from the stamped lines to soften the edges.

After the flowers had dried, I added some Crushed Curry with my marker to the centre of the two large blooms.

I cut out all the blossoms, and used some olive green felt to cut out the leaves with the Pretty Pines thinlits dies.

I adhered everything onto a 6" x 6" piece of Serene Scenery Designer Series Paper with the lovely Bokeh Pattern, which I had adhered to an 8" x 8" pre - primed canvas.
I  popped up a sentiment, "Thankful Grateful Blessed" from the Paisleys and Petals stamp set, which I had white heat embossed onto an old olive piece of card stock.

To give everything a shimmer, I added accents with a clear Jelly Roll gel pen.


This art piece now has pride of place in my entry way, and I love it!

Thanks for visiting. I hope you like this project idea.
Vicki x  💝

Sponging Irresistibly Floral Specialty Paper Part 1


Hello, and welcome to my blog.

Today I have made a card for you using the Irresistably Floral Specialty Designer Series Paper 141644. At  $22.75 for 12 12' x 12' sheets you will have enough for plenty of cards! Look how pretty this paper is when ink is sponged over the top. You can do this with sponge daubers or a sponge, or even a thick paintbrush.


Here is what the card looks like on the inside. I love making the inside as pretty as the outside, and I love the sentiment from the Paisleys and Posies Stamp set.

 The sentiment on the front is from Remarkable You, heat embossed in white on Basic Black card stock.

I have added the Paisley Thinlits Die as the focal image for the card, and mounted everything onto a Basic Black card base.


The colours I chose were Flirty Flamingo, Rich Razzleberry, Daffodil Delight, Emerald Envy, and Tempting turquoise. I feel it has turned out to be such a pretty card. What do you think?  
Have an awesome day, and I will be back tomorrow with more cards using this technique.
 Thanks so much for shopping with me!  Vicki  x 💝

Saturday 27 May 2017

Irresistably Floral Embossing Specialty Designer Paper. Australian Stampin' Up! Demonstrator.


Hi there! Thanks for stopping by today.
I am really enjoying this paper, and the easy embossing effects you can get with it. I have paired it with the High Tide Stamp Set, and used some of the retiring doilies, as well as the stitched Framelits, which will be carrying over into the new catty.


Here is a close up of the coloured embossed image, using versa mark, Emerald Envy ink and clear embossing powder.


The colour combo is the same for both cards, and I used sponge daubers to blend the ink. Retiring Watermelon Wonder is the card base for this card, and Daffodil Delight is the card base for the other one. The other colour I used was Emerald envy, and I love how they turned out.

Have a great day, and make mine by leaving a comment. Thank you so much for visiting,

                                                            Vicki x     💝

Coloured Embossing Powder Technique. Australian Stampin' Up Demonstrator.

Hello, and welcome! I hope you are enjoying your weekend. I am busy crafting away, and playing with this super easy embossing technique.

The Irresistibly Floral Specialty Paper #141644 will be retiring soon, and I wanted to play with some more techniques using this paper. I just can't get enough of it!

Using my sponge, I blended some rich Razzleberry and Tempting Turquoise onto my focal piece, then wiped away any residue with a tissue. Easy!

I cut a very fine strip of Blushing Bride Glimmer Paper #140550 (also retiring) and punched out some teeny tiny stars with the retired star banner punch. I heat embossed the sentiment from the High Tide stamp set #143006  onto Whisper White Card stock, then cut it out using the stitched framelits.

                                                     High Tide Photopolymer #143006
                                                              BUY NOW

Can you figure out how I made Rich Razzleberry Embossing powder?

Simply stamp into the versa mark pad, and then immediately stamp into your Rich Razzleberry inkpad.  Use clear embossing powder over the top and heat set with your heat tool.

Isn't that a neat trick? You can make ANY COLOUR embossing powder using this technique. Just make sure you clean your stamp well.

I made a matching envelope, and mounted my art piece onto a tempting turquoise top fold card.

                      Have an awesome day, and thanks for shopping with me, 
                                                              Vicki x💝